Showing posts with label decorating furniture. Show all posts

Tuesday, July 19, 2011

DIY: wing back chair

This chair was strange, the seat cushion is connected to the frame with hinges.  First I worked on the front bar


This was the first real problem I face, I didn't staple the fabric high enough on along the wing part of the chair.

That gap was a good size, so my solution was to hand stitch some pipping around the base of the arm rests.  This allowed me to leave that end and tuck the wing fabric underneath the arm rest fabric and staple underneath.  (does that make sense?)


The Rest of it was pretty easy.

Thursday, July 14, 2011

DIY: Seat Cushion


Out of all the tips, I will give you, the most important is to have your cat over-see all your work!! 

This chair is actually the 3rd piece of furniture that I have reupholstered, so I went into this project with less stress about reaching the point of NO return.  Ya know a point of NO return is where all the old fabric is off and you have NO idea how to put all the NEW fabric back on.
I started with the seat cushion, first because the husband wanted to measure out the chair and draw a set of schematics from it (I dunno why).  It took me a day and a half to sew out this little lady, and trust me, I had my problems!!

Step-by-Step

Step 1: measure and cut out the seat cushion and allow for inseam
Step 2: measure and make 2 sets of pipping
Step 3: measure and cut out the facing of the cushion
Step 4: sew both sets of the pipping onto the face of the cushion
Bonus Step 5: Draw on the inside of the fabric where your needle needs to sew the pipping (this helps you keep the cushion square and even.)
Step 6: sew on the top cushion

Seams (ha, pardon the pun) easy enough-eh?


First to make the pipping, take the pipping rope tuck it into the fabric (make sure you're using the proper foot and proper sewing needle) And sew!
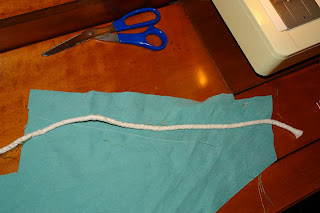


 The measuring and cutting out of the cushion was simple enough.  But measuring out and attaching enough fabric to make the pipping was difficult.  I had to use a procedure I have never used before; you cut the fabric on a diagonal to increase the strength of the seam and make it less noticeable.


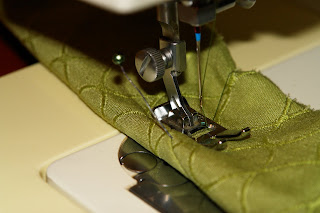


After you sew your pipping sewn, then you have to attach it to the face of the cushion.  This part throws me off every time, after years of always sewing to the back of fabric, it casts a lot of doubt in my mind when I have to sew on the front.  But trust me, you sew the pipping to both ends of the face fabric.  Make sure that from the insides of the pipping still measure the same as the face of your cushion?  Does that make sense?


Can you see the orange lines on the front of the fabric, that is my guide line so I know where I need to sew the pipping.  I had some issues sewing those corners and I can't tell you how many times I had to sew, then rip everything apart, then pin it all back in place, then sew again.  Uh, it took forever!


If you look at the left corner you can see where all the bunching is, it was driving me crazy!! But eventually I got it all squared away, I finally had to sew a little of the left, then sew a little of the right side, the problem was I made a sharp 90degree turn then I sewed 4inches and made another 90 degree turn and sewed 5inches and made another 90degree turn.  The tension on the pipping had to be just right in order to make it square.


Stay tuned for the, 'DYI-The Chair.


Also, check out these sites:
 The rug one is pretty cool!!
carpettheworld.org
therugboutique.com
orthodoxcandles.com

Monday, June 27, 2011

DYI: lamp shade

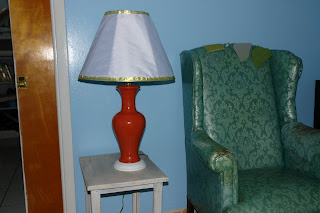
I am sorry, I do not have a good quality before picture of my lamp.  But, I did manage to capture the 80's style lamp shade.  I got it in my head that I wanted to sew a new lamp shade, why I decided to march down this thread paved road, I have NO idea.  Though I love the outcome, I will NEVER do it again.  ...EVER!!

The reason?  Mainly because of how tedious it was...and I am awful at sewing on a curve.  

Take a look at the 80's style lamp shade, pretty nice, eh?  It's broke in the back b/c I originally tried to take the part that looks like the lid of a toothpaste off just leaving me with the plastic bottom.  I was going to glue the fabric onto the plastic, but it was so old...the entire lamp shade fell apart.  So I grabbed the lamp shade frame off another lamp and starting sewing.

I also spray painted the bottom-white.  I just loved the orange in the lamp-I couldn't bring myself to spray it.

But I must add that the fabric was $6 a yard and I already had the ribbon on hand.  So it was much cheaper than going out and buying a generic $24 lamp shade. 

DIY: wing back chair

Before: (the fabric is plastic, people!)
AFTER!!


Wednesday, June 22, 2011

DIY: headboard

I do a lot of DIY projects, and most of the time, I look to other bloggers who have already blazed the trail before me.  However, I have the attention span of a gnat, so a lot of the times I half-way read the instructions and then...well...sorta...make it up as I go along. I realized the first time we went to tuft and a button on my headboard and it became a flying projectile/missile across my den, that PERHAPS I should have read the instructions...all the way through!!


 For added support we used spray adhesive to help bond all the foam and stuffing together (before putting on the fabric)

 We used particle board for the headboard itself, and backed it with a smaller piece of real wood, for support.  The legs are 2X4's.Currently our bed is a queen, but someday we will upgrade to a king, so we opted to make this headboard for a King...room to grow!!
 Before we added the fluff the husband measured out drilled holes into the back of the wood so we knew where the buttons would go in. (I went back and circled them with maroon marker, so we would know the difference between a "button hole" and a "random mark" )
 This part is important if you want a deep tufted look, "cut into the foam the depth you will want the tuft to be."  I didn't do this, and the buttons couldn't handle the pressure the foam was putting on it. (and trust me, when the button pops off, it is like a missile-flying at your face...)
 To keep an even look, we stapled top and then bottom and then each side.  It's a pain in the butt, but it keeps the fabric tight and even-giving it a professional overall look.
 The buttons were a pain in the butt.  I discovered that in order for the buttons to stay on, it had to be a fine balance between just enough fabric, glue and a hard enough beating to make them "snap" shut.  I had to go back several times and re-adjust.  Also, I tend to be a bit obsessive, so I had to cut a chunk out of the fabric and I wouldn't let myself look at which part of the pattern was put on the button.  They were also randomly selected when we put them on...otherwise, I would have obsessed over where each button went. 
 So...we didn't have any thread, or fishing wire.  So, we did the next best thing...we used guitar string. 
Another cheap trick: After this project was complete I was at target or walmart (I forget which) and I saw how cheap egg crates are...much cheaper than foam from hobby lobby or joannes.  So if you do it, buy egg-crate foam!

I was pretty upset at first with how shallow the tufts were, but over time I have really fallen in love with it.  It's like a small dainty detail you don't see at first, just adds to the layers of the room-I guess.


Wednesday, August 25, 2010

Why did it take me so long to do this: Rocking chair.

Do you see this olive-drab, ugly cushions? Well I have been staring at them for a year now. And I just couldn't stand it anymore. Plus, they stink. That tweed fabric holds in all kinds of smells.


The cushions belonged to this rocking chair, that my husband saved from the burn pile. It took up residence on Chad's side of our bedroom, mainly b/c we didn't have another place to put it. So it lived under piles of old clothes, brown boxes and crap for the last year.


Well one day I had ENOUGH!

I striped that awful fabric from it.


The cats helped me too. Afterall, I couldn't do the work without them. I mean some people are born with leadership skills and other people are the born workers-in the cats eyes...I am just a worker-bee!


By you-tubing lessons online, I taught myself how to sew my first seat cushion! I have never done anything this elaborate before, and I broke 5 needles in the making of this project. But I am excited how wonderful it turned out!! It's not square, and has many flaws...and to tell you the truth, it bothers me. But, an artist is their own worst critic...so I gotta go easy on myself.

After all, I sewed a seat cushion!


I also sewed the back and it turned out much better than the seat cushion. For stuffing (and I must admit, it's a brilliant idea) I used old pillows. They were my old feather pillows I never had the heart to throw out.


I dragged Chad to the fabric store, and I walked around with all the fabrics I plan on using in the bedroom...and Chad picked out this icy-blue fabric.